Data Manager gives team members the ability to view, filter, sort and download submission data from the platform.
For non-platform users, we also have the Data Manager App. For more information on the app check out the article.

TABLE OF CONTENTS
- Setting up Data Manager Forms
- Multi-Factor Authentication (MFA)
- Require MFA
- Data Manager App
- Getting Help
Setting up Data Manager Forms
Step 1: To start using Data Manager, you must make sure that you have configured a Retention Policy for submission data. This can be completed through the account screen.

Step 2: If the pricing tier for your account has a limit on the number of Data Manager Forms, you will need to select the forms you want to use in the accounts screen. Click the "Add Data Manager Form" button and select the form. Note that this limit is account-wide, meaning it will affect all environments.
You can skip this step if your pricing tier does not have a limit to the number of Data Manager Forms.

Set up the Data Manager App
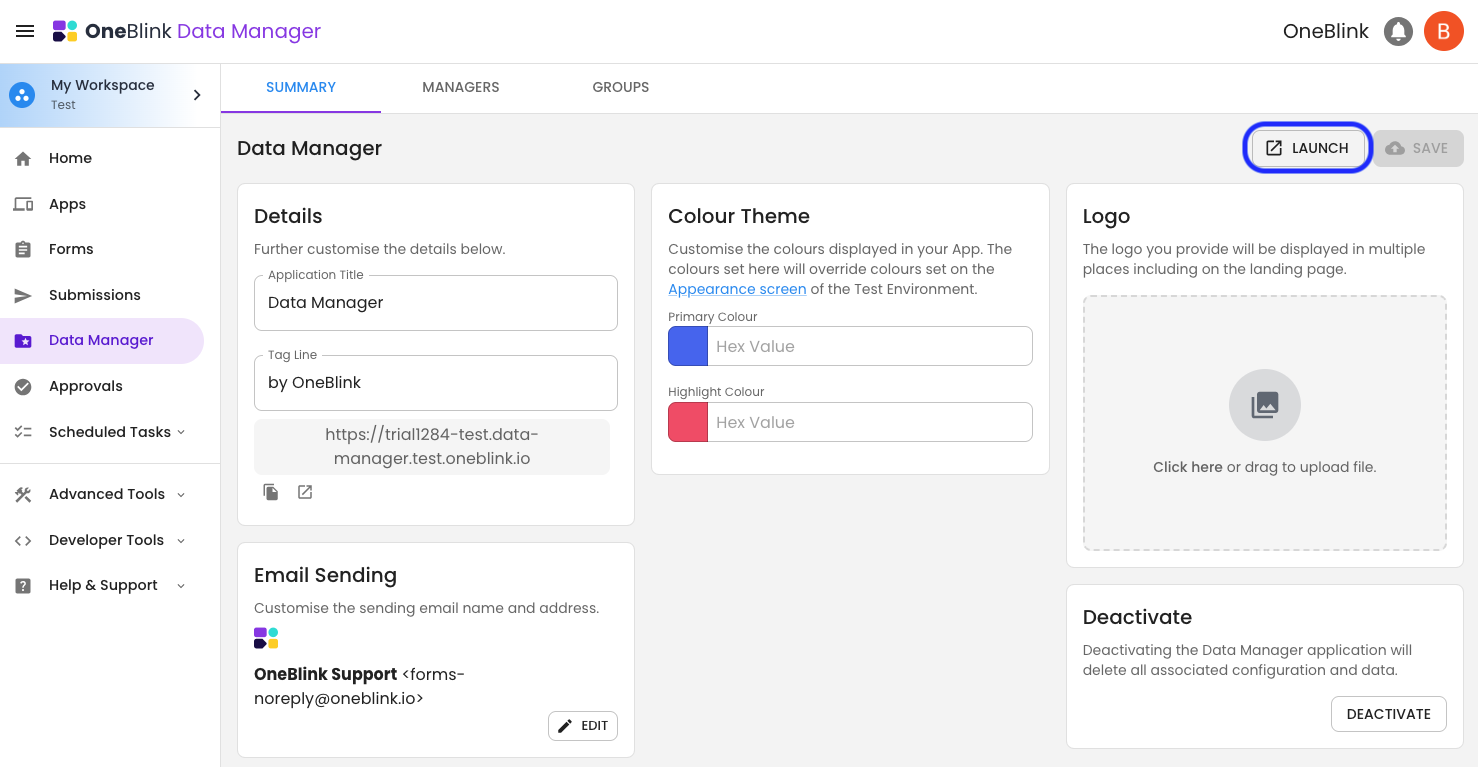
To start setting up your app, select the Data Manager tab:

Summary
Similar to other solutions, the summary tab allows you to style and customise your app.
Details - The title and tagline of your app, appear on the login screen and in the banner of the applet.
Colour Theme - This allows you to customise the Primary and Accent colours for your app.
Logo - This is the icon used for the app, it will appear on the login screen and in the banner of the app.

Managers
Here you can add, remove and filter your Data Manager managers. A manager must be added to this list before they can use the Data Manager applet. Managers are assigned to groups; these groups dictate which forms they have access to. You can create a new group by adding a new member or modifying an existing one, and adding a new group in the group input.
Once a manager is added, they will receive an email with a temporary password. They will need to use this to log in before setting a new password.

Groups
The groups menu allows you to assign forms to your groups. Click the Add Form drop down and select from your forms list. Both forms and mangers can be added to multiple groups. When a manager opens the Data Manager applet they will only have access to the forms assigned to their group(s).

Multi-Factor Authentication (MFA)
Multi-factor authentication (MFA) or two-factor authentication (2FA), is a best practice that requires a second authentication factor in addition to a user name and password sign-in credentials. We strongly recommend enabling MFA to enhance your account security.
To enable MFA, navigate to the Preferences screen in the Data Managers app then select the profile icon in the top right corner of the screen.
Then select Preferences:

Select Setup MFA:

Authentication uses an authenticator app like Google Authenticator or Microsoft Authenticator to generate one-time passwords. Follow the steps included in the MFA set-up to configure your authenticator app and start using MFA to securely log in to the approval platform.

Upon completion, the Multi-Factor Authentication (MFA) configuration should display as enabled.

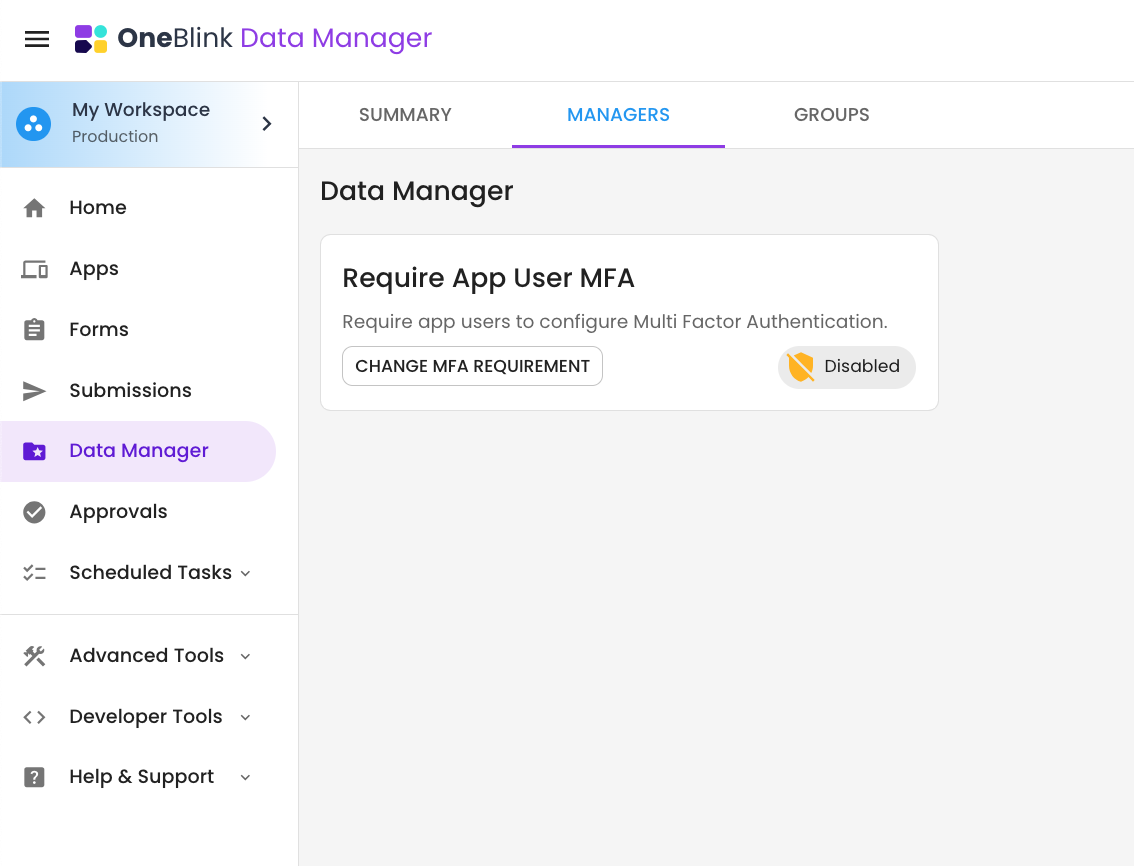
Require MFA
Requiring MFA ensures all Approvers must have MFA configured. To enable this option, it is located in the Managers tab of the Data Manager Menu. Please note that to configure this setting, you will need to have the App Users: Manager permissions, and to disable this setting, you will need to contact support.
Data Manager App
You can open the Data Manager app using the Launch button on the Data Manager > Summary tab.
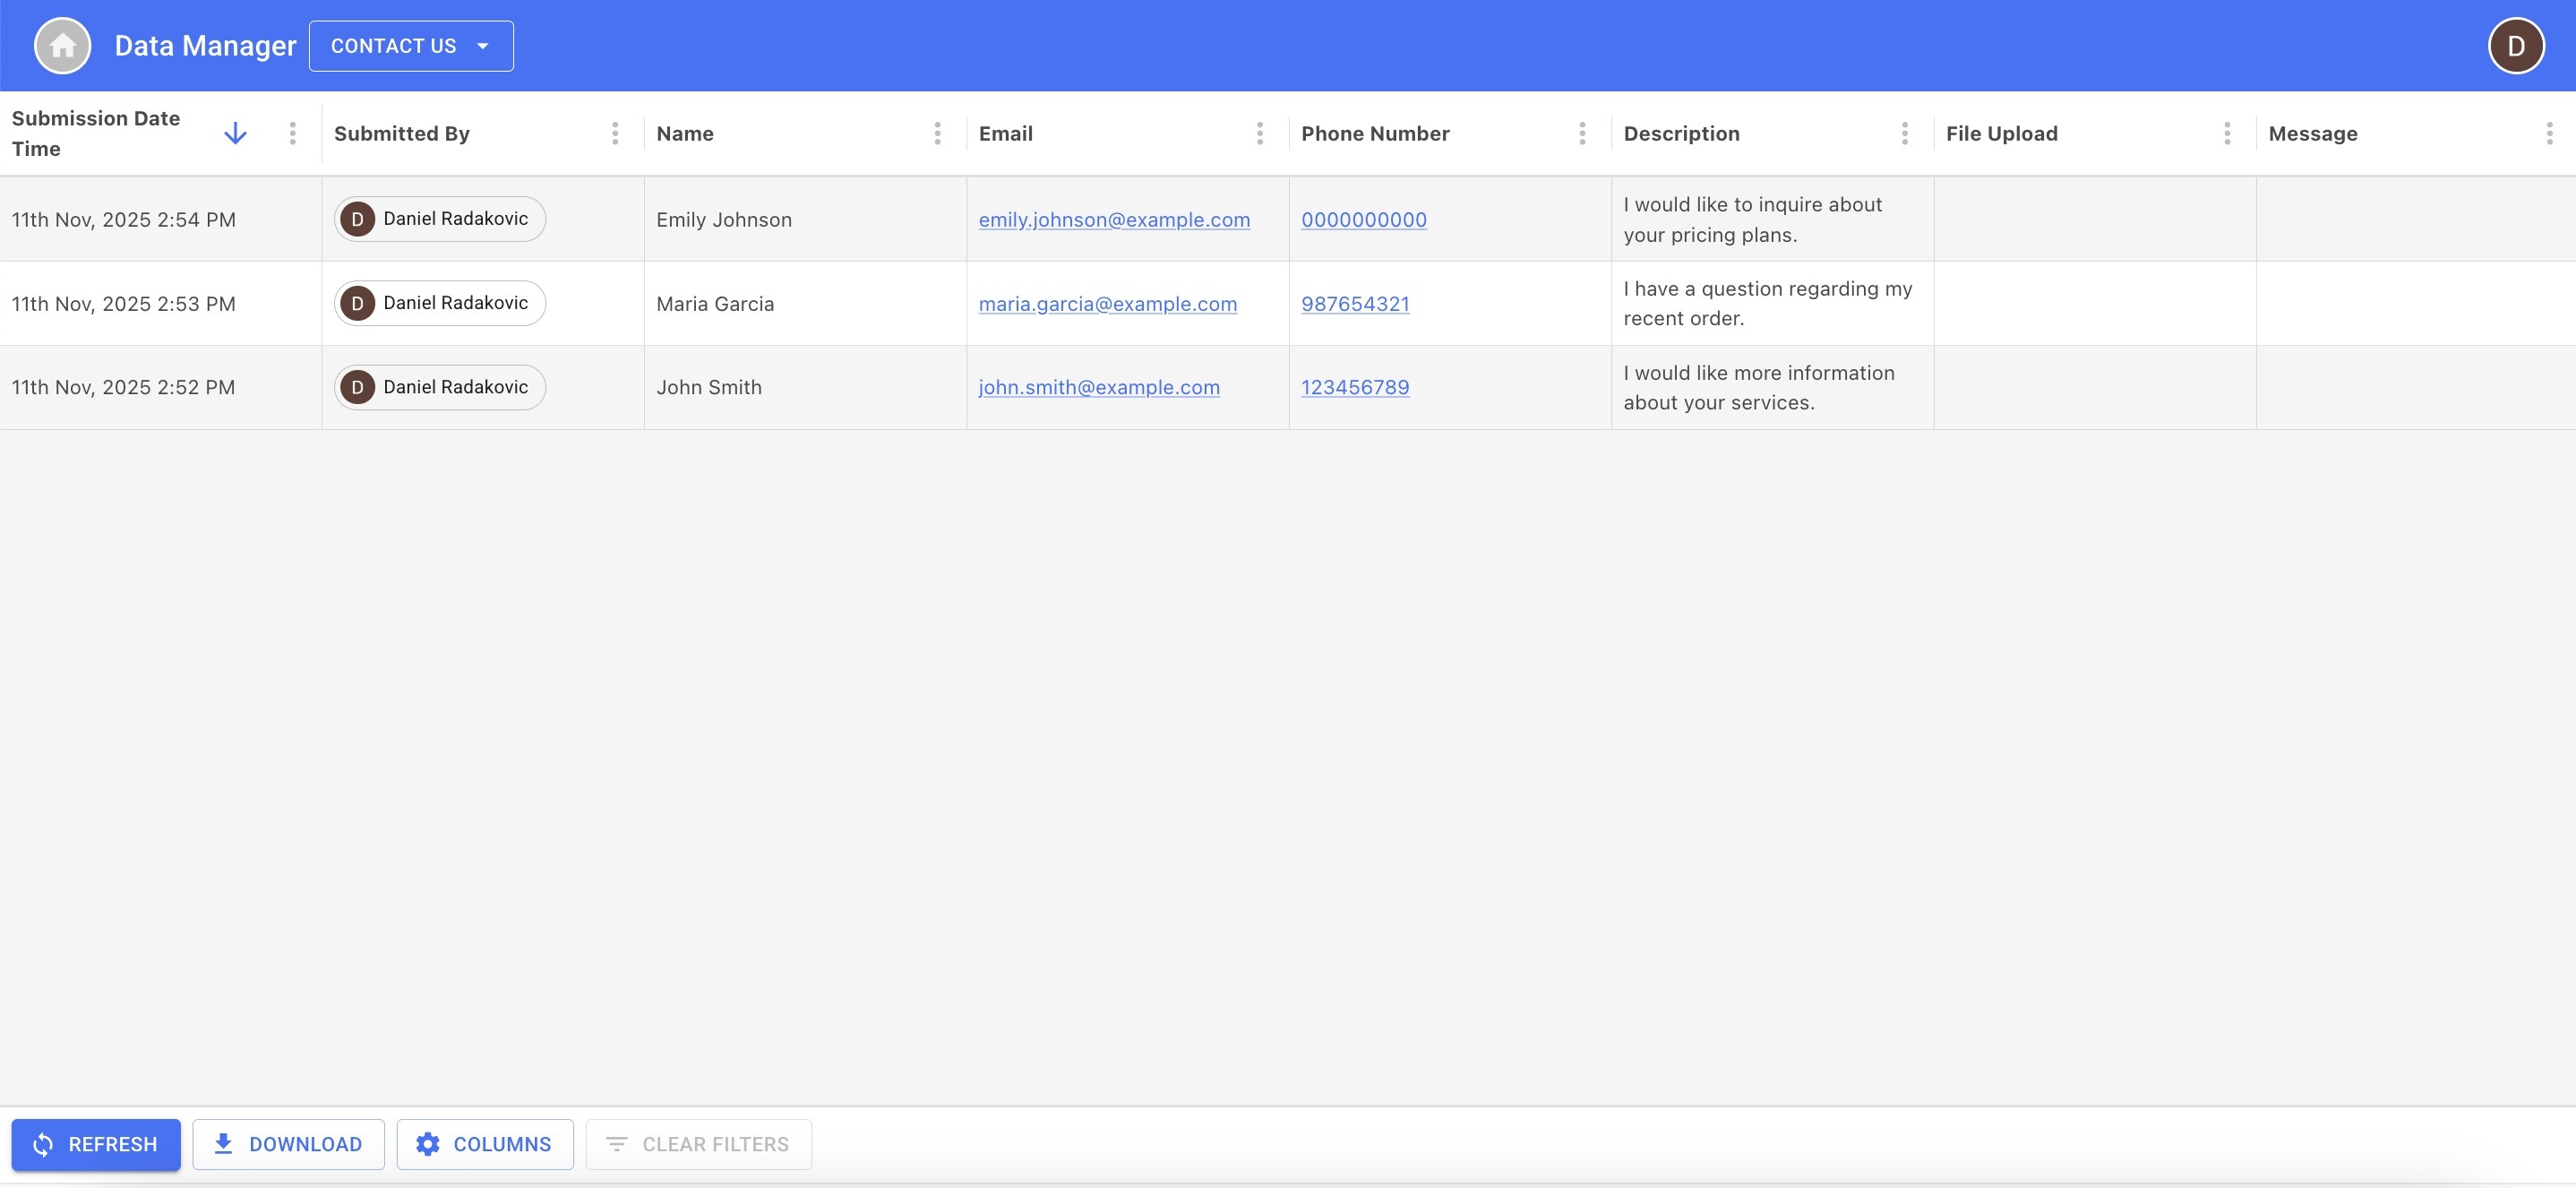
Once logged in, managers will see the submission data of the first form they have access to. Managers can change which form they are viewing using the drop-down in the top left of the screen.
Resizing
You can easily resize any of the columns by clicking, holding and dragging the right borderline of the column.
Columns can also be hidden from this view. Click the columns button at the top of the screen to show or hide any columns. By default, the Submission ID and External ID are hidden from this view. Columns can also be hidden by selecting the column settings and clicking the hide button.
Filtering
Data Manager also allows you to filter your data by entering search parameters into the columns. Filters can be removed by clicking the clear button in the column settings. Filters can be added to multiple columns at the same time. An element will display the filter icon if it is currently being filtered. To clear all filters, click the clear filters button.
Text elements can be filtered using a fuzzy search, allowing you to view all submissions that match your search input.
Number elements can be filtered on "greater than or equal to", or "less than or equal to".
Date and time elements can be filtered on a before-and-after date and time search.
User-select elements like checkboxes and radio buttons will allow you to select from the available options. Matching any submission that included those options.
Note: Filter options for user-select elements are based on the most recent submissions form definition. This means that if options are added or removed from a form element, the available filter options in Data Manager will reflect those changes once the form is submitted again, regardless of what values exist in previous submissions.
Sorting
Data Manager also allows sorting on columns. Columns can only be sorted one at a time.
Data and Time can be sorted by most recent to oldest or vice versa.
Text elements are sorted alphabetically.
Numbers and calculations can be sorted in ascending or descending.
Download
Data Manager allows you to download your data as a CSV file.
These downloads will take into account any hidden columns, filters or sorts that have been set on your Data Manager view. Allowing you to download only the data that is valuable to you.
Getting Help
If you need any assistance with Data Manager, please reach out through the Report Issue menu or email support@oneblink.io.
Was this article helpful?
That’s Great!
Thank you for your feedback
Sorry! We couldn't be helpful
Thank you for your feedback
Feedback sent
We appreciate your effort and will try to fix the article